So I changed my Blog name to include crafts (copics only seemed too limiting)!! (Maybe now I will post more stuff!) I have such a love for ALL things crafting and especially scrapbooking. So I thought I would start with my newest found company: Kiwi Lane Designs!! This to me takes scrapbooking back to the basics. Do you remember when we didn't have all the tools, supplies and machines? These are designing templates that help you visualize then create pages using only pencil, scissors and distressing inks!! I love it!! I find it very relaxing to freehand cut paper. Stop by their website at kiwilane.com!!!
This is a picture of a page that I did and turned for their weekly challenge. (I hope I win because I really love this page!!!
The paper is an older Bo Bunny line (maybe last year). I created the beach balls with circles that I freehand cut to get the color insets! No fancy die cutting machines here!!!
Tuesday, May 28, 2013
Saturday, January 5, 2013
Happy New Year & a February Card Class
Happy 2013 everyone!! I have been so bad about posting to this blog. It's really sad too because this is what I really want to do. So of course one of my new year's goals is to do more here. We will see how it goes. I do have somewhat of a start as I have created a Youtube Channel. Now don't get too excited because there is nothing there yet. Not to mention I have no idea how to make, upload and edit videos yet, not to mention I don't have a clue how to make sure they connect to my blog. I sometimes feel so clueless!! I actually feel very determined to get it done though (of course don't we all feel that way in January) This is why I call them goals and not resolutions!
So, enough said about that. I have a class coming up in February and here are the cards I have created for that class. The stamps are Lawn Fawn (first time I have used this brand). They are great for a very easy basic Copic Class. I used Bazzill Cardstock and Echo Park Winter Wishes is the pattern paper I used.
And there you have it!! I actually very much like this set of cards although at first I thought I wouldn't. These would be very easy for a beginner to make. All of the coloring is 2 or 3 step coloring. Until next time: Keep it Colorful!
So, enough said about that. I have a class coming up in February and here are the cards I have created for that class. The stamps are Lawn Fawn (first time I have used this brand). They are great for a very easy basic Copic Class. I used Bazzill Cardstock and Echo Park Winter Wishes is the pattern paper I used.
And there you have it!! I actually very much like this set of cards although at first I thought I wouldn't. These would be very easy for a beginner to make. All of the coloring is 2 or 3 step coloring. Until next time: Keep it Colorful!
Monday, October 1, 2012
Christmas Card Class
Ok it's late (at leas for me) on a Monday but I know I haven't posted in forever and I really wanted to get these on here. This is for a November Card Class that I am teaching at Cord on the 13th.
I do have a few more images to upload (closer look). I will try really hard to get them posted as soon as possible. I am teaching a skin class at Cord tomorrow so maybe you will see something from me by Wednesday.
Thursday, August 9, 2012
Stamps at Archivers!
As some of you may know, Archivers had a big stamp sale this past Tuesday. All their stamps were 43% off. When they first came to my neck of the woods I would say they had a fairly big stamp section. It has dwindled since then. I was able to find 3 that I just couldn't live without. I really hope that this was an effort to get rid of some oloder stock so that they can refresh that section of the store. I would obviously like to see more stamps that I can use my copic markers on!
I found this little cutie on a Chrismas display they had set up. He is from Hero Arts and I am not sure if he is new this season. Even though I am NOT ready to think of Christmas I knew that he would be lots of fun to color!
I am adding to what seems to be a collection. I just think these stamps are just too too cute! I already have 2 others from this "girlfriends" collection. Here is the crazy part though, I have not sat down and colored any of them yet. All of my coloring of late has been for classes. I just want to sit down and color just for the love of coloring!! Who knows maybe I will color this weekend (as of now my weekend isn't too jamed packed). Time to start bedtime preperations so that's all for now. Until next time, keep it colorful!!!
I found this little cutie on a Chrismas display they had set up. He is from Hero Arts and I am not sure if he is new this season. Even though I am NOT ready to think of Christmas I knew that he would be lots of fun to color!
I am adding to what seems to be a collection. I just think these stamps are just too too cute! I already have 2 others from this "girlfriends" collection. Here is the crazy part though, I have not sat down and colored any of them yet. All of my coloring of late has been for classes. I just want to sit down and color just for the love of coloring!! Who knows maybe I will color this weekend (as of now my weekend isn't too jamed packed). Time to start bedtime preperations so that's all for now. Until next time, keep it colorful!!!
Thursday, August 2, 2012
Skin Color
The lovely ladies who take my classes have been after me to do a technique class on coloring skin. Well I have finally given in and placed it on the calendar for September. So needless to say I have been spending time creating a cirriculum for that class. I have put together a blending chart for them to use for favorite color combos and I sat down tonight and colored a hula girl from la-la land stamps. Thought I would share those images with you tonight.
This is the color chart I created I guess I should have zoomed in a little but you get the idea. I went ahead and colored in the boxes with skin combos that I use. This is a 6x8 so I can put it into my copic binder that I have created/work in progress.
In this image I am trying for a darker/Hawaiian skin tone. Also wanted to show the importance of shading around body parts (the nose and lips). I have arrows to indicate my light source (upper left). I am actually excited about finishing her because I am very happy with how her skin is coming along. Maybe I'll show a finished card some day soon. That's all for now, keep it colorful!!
Tuesday, July 24, 2012
New Copic Storage!
Here are the pictures as promised!
This is the box itself. I got it at Tuesday Morning. It is material over a very hard casing. I assume it is a very very strong chipboard type of material. It zips shut and as you can see has 2 zipper pulls. There is also a business card pocket on the front (very hard to see in this pic). The card that was in there just says "storage" and underneath that says "Raymond Waites". Hopefully if you are interested in the case you can google it with that info.
This is a view of the side. Both sides have a very nice fabric handle. I think you can see it in this photo.
Here is what it looks like inside! It holds more than the amount of Copics that are cuurently available although right now the exact number eludes me.
I was trying to get a good shot of the inside of the case. What I have done is taken plastic canvas (I got mine at Hobby Lobby) and I used embroiderey floss to sew the four pieces together to make a square that fit perfectly into the box. I then attached the cross pieces using floss as well. I did this to both ends of the cross pieces. For the pieces that go from front to back of the box I cut up into the canvas on both pieces so that would slide together. These steps were not done in that order and I'm not gonna lie, this is something that I would NEVER take on again!!!! If I get people interested I would be happy to take my markers out to show better pics of the insert. Feel free to leave a comment or question and I will answer as soon as I can. Keep it colorful!!!
This is the box itself. I got it at Tuesday Morning. It is material over a very hard casing. I assume it is a very very strong chipboard type of material. It zips shut and as you can see has 2 zipper pulls. There is also a business card pocket on the front (very hard to see in this pic). The card that was in there just says "storage" and underneath that says "Raymond Waites". Hopefully if you are interested in the case you can google it with that info.
This is a view of the side. Both sides have a very nice fabric handle. I think you can see it in this photo.
Here is what it looks like inside! It holds more than the amount of Copics that are cuurently available although right now the exact number eludes me.
I was trying to get a good shot of the inside of the case. What I have done is taken plastic canvas (I got mine at Hobby Lobby) and I used embroiderey floss to sew the four pieces together to make a square that fit perfectly into the box. I then attached the cross pieces using floss as well. I did this to both ends of the cross pieces. For the pieces that go from front to back of the box I cut up into the canvas on both pieces so that would slide together. These steps were not done in that order and I'm not gonna lie, this is something that I would NEVER take on again!!!! If I get people interested I would be happy to take my markers out to show better pics of the insert. Feel free to leave a comment or question and I will answer as soon as I can. Keep it colorful!!!
Thursday, July 19, 2012
Ok I know! Where in the world have I been right? We have had major computer issues and I decided to stop posting until I had my very own laptop. Well that happened for me last night!!! Why did it take so long? Well so much has been happening in my personal life that it was very much put on the back burner. We bought a house this past December (a real fixer upper) and that is exactly what we have been doing since the beginning of the year. Still not totally complete, the contractor has just a few things left to do in the kitchen.
So enough about houses!! Let's talk copic!! Still teaching classes at Cord and now have a group of women that will be seeing me for private monthly classes!! I have also replaced Roxanne. Roxanne was my previous copic case that I created (look back to my previous post). I just had to name her and that's what I came up with. I will put pictures of my NEW copic case on here ASAP. I also would like to start doing some youtube videos but I have no idea how to do it yet. I am so computer illiterate!!! So that is all for tonight. Be back soon!!! Keep it colorful!!!
Saturday, August 20, 2011
Busy, Busy August
I can't believe how long it's been since I have posted. I must get better at this. Things are always crazy in August with back to school, my oldest child's birthday and my anniversary (both on the same day). Anyhow, a week ago today I went to Cincinnati for the Stamp Away USA Convention. It was awesome and I spent entirely too much money. I took a picture of all my "loot" and I will try to get it posted for ya. I also have several cards to post as well but just don't have the time this morning as I am writing this right before leaving for work. The other thing that I have done lately is I have been working on my own Copic Coloring book. I believe I had mentioned in an earlier post that I wanted to create something like this to just hold some of my work (I don't always put everything on a card). I have put the book together and now I need to work on the front cover (boring white right now)! Not to worry I will Copic it all up!! My hope is to get a post together tonight with pictures. A few other things going on with me: zentangle, drawing and a month in my life album!! More about that later. That's all the time I have for now, keep it colorful!!!
Monday, July 25, 2011
A lot to chat about!
Did ya think I fell off the face of the earth? I have so much to talk about and it is late at night so I'll get right to it! First, I took the kids and went on a little road trip to Cincinnati to a rubber stamp store that I had heard a lot about. The kids and I enjoyed the time together and I definitely enjoyed the stamp store. I bought several stamps and even the latest issue of Card Maker Magazine. Love that magazine and hadn't been able to find the newest issue here in Columbus. I am in the process of coloring the stamps I got and am very excited about them. I will post pics as soon as I can. My first image took me a couple hours to color. Now I just need to put together a card with it. Secondly, my hubby just returned from Summer CHA (what's wrong with that picture? Shouldn't I be the one going to CHA?). Yes he went, he is the Director of Merchandising for Cord Camera so he got to go and I got to stay home with the kids. Doesn't seem fair!! He likes to send me pictures of things like the Copic Booth!! He does usually bring me back a few goodies though. This time I got a couple of idea books and a bag from Silhouette. Third and finally!!! I got 23 more Copic Markers this weekend!! This is very exciting for me because I had placed my order to finish off all of my colors (minus grays, fluorescent, and earth tones). What was a little of a bummer was that one RV is on back order and somehow the reds I needed didn't get on my order at all. That's ok though I am still having a great time with all my new colors. My next goal is to get them entered on the copic color website. I have 3 cards that I will hopefully get posted for all to see sometime this week, so keep watching for that. I need to say goodbye for now because my fingers are not cooperating with me and I keep making spelling mistakes!! Thank God for spellcheck! Until next time, keep it colorful!!
Wednesday, July 6, 2011
Happy Hump Day!!
Happy 4th of July as well. It always seems to me that the 4th marks the beginning of the last half of summer and boy is that depressing. I have been so crazy busy that I'm not sure where the first half went. Tomorrow will be spent with my kids at the pool and I will hopefully get some coloring in tomorrow night. I thought I would share with you a couple of cards I made for my last copic card class.
The stamp is from Stampendous, the paper is Bazzill and the ribbon is of course, white and I colored it to match exactly! Love that about Copics!! Of course I have a HUGE stockpile of white ribbon in my craft room.
Uncle Sam is also a Stampendous Stamp, cardstock is Bazzill and the printed is We-R-Memory Keepers. Both cards are from my June Copic Card class that I had at Cord. As always I try to keep these cards very simple as the class is only an hour and a half long and believe me it takes that long to color 3 images. Look at my previous post for the balloon card that we also did during that class. My July class features two adorable birthday stamps and a monkey ready for some pool fun. I hope to get those posted really soon. It seems that my students really like to color people stamps, I do too!!
I got an idea earlier today that I am excited about!! You know how art journals are all the rage now. (I even have one and am slowly filling it) I am excited to start a coloring journal! Not sure how I am going to make it happen yet. I do already have a card portfolio and a coloring portfolio (I use these when I teach). If you have any great ideas please let me know!! I will also post when I have it all figured out (oh that could take awhile KWIM!!)
I feel as though I am rambling, could be cause I'm exhausted. That being said I will leave you for now. Keep it colorful!!!
The stamp is from Stampendous, the paper is Bazzill and the ribbon is of course, white and I colored it to match exactly! Love that about Copics!! Of course I have a HUGE stockpile of white ribbon in my craft room.
Uncle Sam is also a Stampendous Stamp, cardstock is Bazzill and the printed is We-R-Memory Keepers. Both cards are from my June Copic Card class that I had at Cord. As always I try to keep these cards very simple as the class is only an hour and a half long and believe me it takes that long to color 3 images. Look at my previous post for the balloon card that we also did during that class. My July class features two adorable birthday stamps and a monkey ready for some pool fun. I hope to get those posted really soon. It seems that my students really like to color people stamps, I do too!!
I got an idea earlier today that I am excited about!! You know how art journals are all the rage now. (I even have one and am slowly filling it) I am excited to start a coloring journal! Not sure how I am going to make it happen yet. I do already have a card portfolio and a coloring portfolio (I use these when I teach). If you have any great ideas please let me know!! I will also post when I have it all figured out (oh that could take awhile KWIM!!)
I feel as though I am rambling, could be cause I'm exhausted. That being said I will leave you for now. Keep it colorful!!!
Tuesday, June 21, 2011
Copic Card Class
Happy Tuesday everyone. It is a hot one here in Columbus today, supposed to hit 91 and my guess is that it did! We had a horrible storm this morning that brought in the humidity. Yuck I tell ya! I actually have a free day tomorrow and am hoping to get the kids to the pool.
Anyhow tonight is my Copic Card class at Cord and I thought I would post one of the cards we will be working on tonight. It's actually one of my faves. I was kinda impressed that I was able to color translucent balloons (not always an easy task).
Not sure you can see the full effect of the balloons behind each other from this picture but it is definitely a favorite card. Speaking of cards, is everyone making cards to send to the troops? I plan on turning in a bunch and Cord is a designated drop off spot. If you haven't heard about this awesome gift that we are giving to our soldiers it is from We-R-Memory Keepers and I'm sure you can find some info on their website. You should also be able to find a store in your area that is a drop zone. So happy cardmaking and keep it colorful!!!
Anyhow tonight is my Copic Card class at Cord and I thought I would post one of the cards we will be working on tonight. It's actually one of my faves. I was kinda impressed that I was able to color translucent balloons (not always an easy task).
Not sure you can see the full effect of the balloons behind each other from this picture but it is definitely a favorite card. Speaking of cards, is everyone making cards to send to the troops? I plan on turning in a bunch and Cord is a designated drop off spot. If you haven't heard about this awesome gift that we are giving to our soldiers it is from We-R-Memory Keepers and I'm sure you can find some info on their website. You should also be able to find a store in your area that is a drop zone. So happy cardmaking and keep it colorful!!!
Wednesday, June 8, 2011
Copic Storage
So here it is (finally)! Was gonna post it yesterday and just my luck the power was out. No idea why, we had a bad storm AFTER the power came back on. Taught a Copic Basic class last night, it is always refreshing to see a new person experience Copics for the first time. So enough about my day (or days).
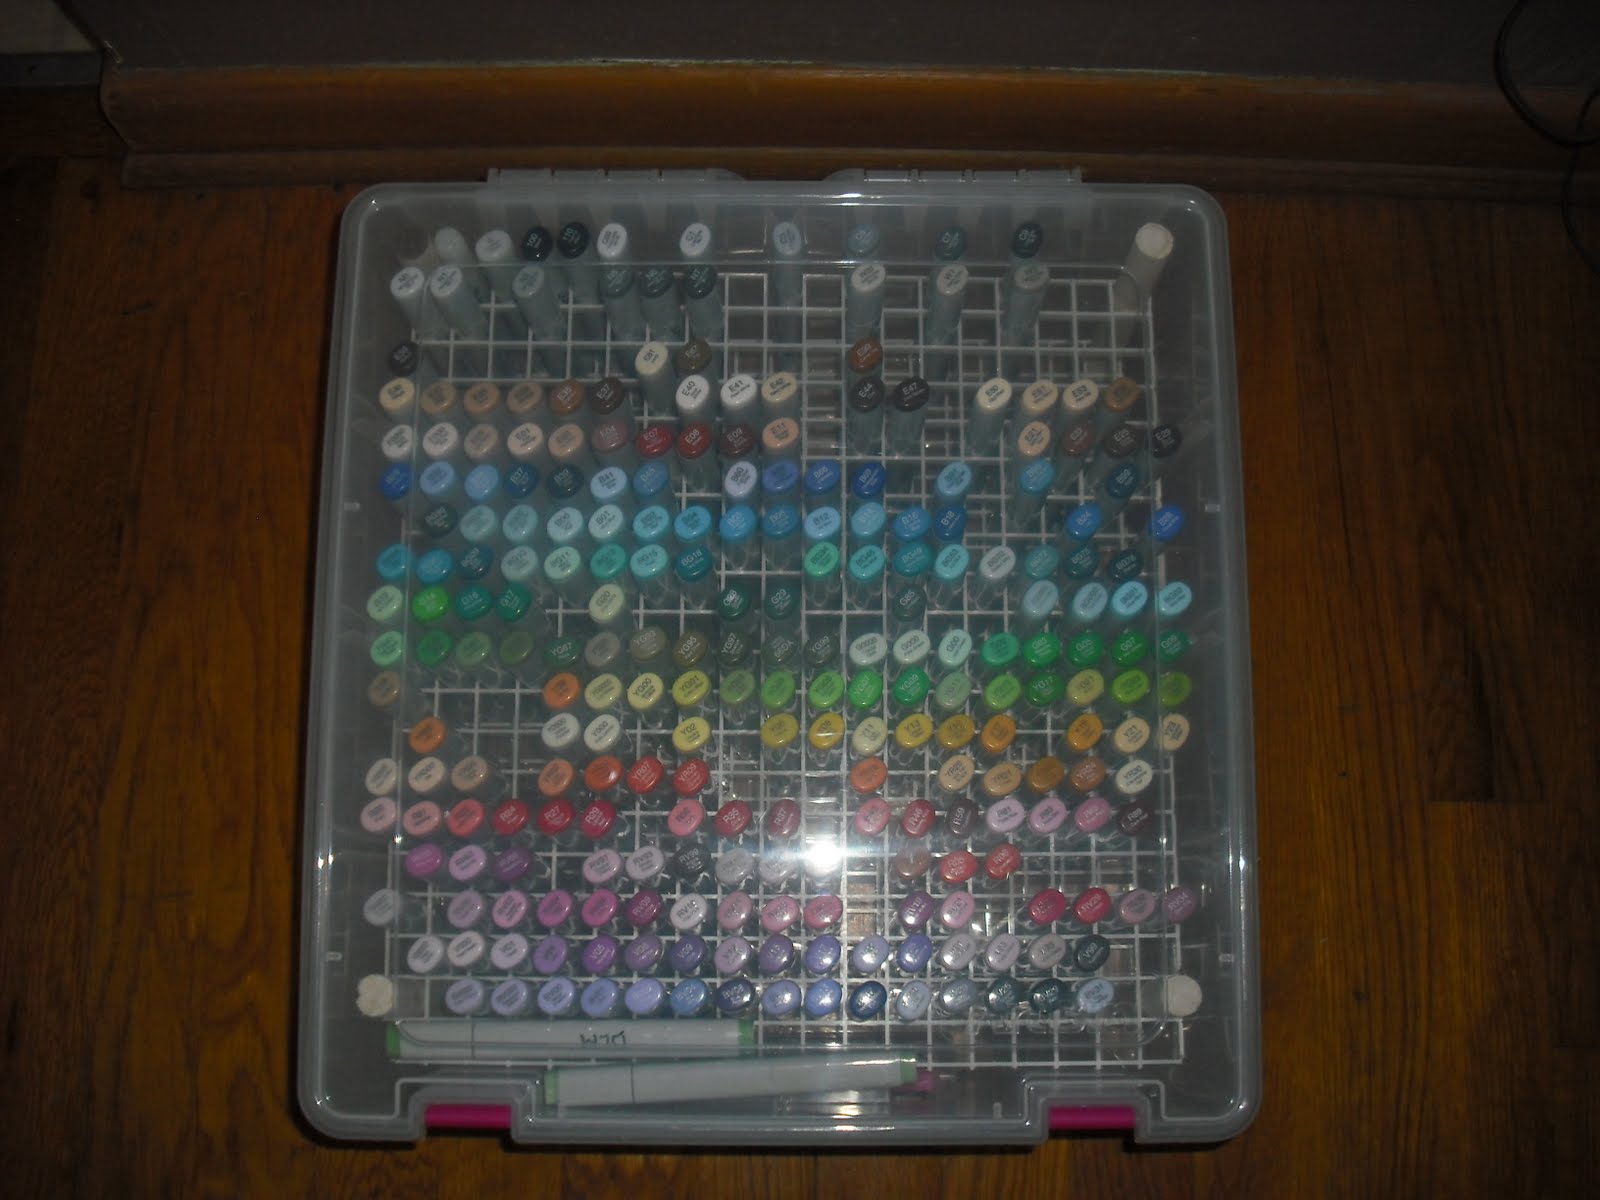
Here is a picture of my Copic Storage Bin. It is absolutely awesome for travel.
This is how I created it. First let me start by giving credit to the person who I got the idea from. Her name is Helen Johnson and you can visit her blog at bhelenj.blogspot.com. I did mine a little different from hers but the concept is the same.
I started with the Double Deep Super Satchel from Art Bin.
I then made the insert to hold the markers. It is made from a 5/8" dowel rod and a florescent ceiling light grid style cover (found at Lowes or Home Depot). I got mine at Lowes (in the ceiling tile section) and it cost 11 and change (you can make 2 boxes from one tile so find a friend and split the cost). You need a saw that has at least 25 teeth per inch to cut the ceiling tile (I used a hacksaw blade but be very careful since it is not in the saw). The art bin actually tapers in slightly so the bottom grid was cut 19x19 little squares across and the top grid is 19x20 squares across. The top grid will sit on the lip of the recessed area of the handle. The dowel rod will fit perfectly inside the squares at each of the four corners but do be careful when inserting them as the grid will break easily. It should look like this:
Notice that my dowel rods are taller than the grid. I did this to help add support to the lid in case something would get set on top of it. Now let me tell you that it WILL NOT hold Copic Original markers but will hold the Sketch and Ciao. When you do the math this bin will hold 357 markers (19x19-4=357).
The grid simply sits inside the bin and can come right out if you should want to use the bin for something else. And here it is filled with my markers!
Hope you have fun creating your own Copic Storage system! If you have any questions please let me know and I will respond as promptly as I can. Until next time, keep it colorful!!!
Here is a picture of my Copic Storage Bin. It is absolutely awesome for travel.
This is how I created it. First let me start by giving credit to the person who I got the idea from. Her name is Helen Johnson and you can visit her blog at bhelenj.blogspot.com. I did mine a little different from hers but the concept is the same.
I started with the Double Deep Super Satchel from Art Bin.
I then made the insert to hold the markers. It is made from a 5/8" dowel rod and a florescent ceiling light grid style cover (found at Lowes or Home Depot). I got mine at Lowes (in the ceiling tile section) and it cost 11 and change (you can make 2 boxes from one tile so find a friend and split the cost). You need a saw that has at least 25 teeth per inch to cut the ceiling tile (I used a hacksaw blade but be very careful since it is not in the saw). The art bin actually tapers in slightly so the bottom grid was cut 19x19 little squares across and the top grid is 19x20 squares across. The top grid will sit on the lip of the recessed area of the handle. The dowel rod will fit perfectly inside the squares at each of the four corners but do be careful when inserting them as the grid will break easily. It should look like this:
Notice that my dowel rods are taller than the grid. I did this to help add support to the lid in case something would get set on top of it. Now let me tell you that it WILL NOT hold Copic Original markers but will hold the Sketch and Ciao. When you do the math this bin will hold 357 markers (19x19-4=357).
The grid simply sits inside the bin and can come right out if you should want to use the bin for something else. And here it is filled with my markers!
Hope you have fun creating your own Copic Storage system! If you have any questions please let me know and I will respond as promptly as I can. Until next time, keep it colorful!!!
Monday, June 6, 2011
Back from Indy!
What a great time I had! Not only did I enjoy the class but I truly enjoyed my time alone. I was super exhausted when I got home so I slept in a little on Sunday and even took an afternoon nap. Tomorrow I am teaching a Copic Basic Class at Cord and I am looking forward to that. On the 21st I will be teaching my Copic Card class and I will try to get pics up ASAP. For now here is a pic from Saturdays class. I was so excited to find Marianne Walker there (don't know how I missed it on her blog that she would be there).
From left to right is me, Colleen Schaan, Marianne Walker and Bianca Mandity. I was so happy to get this shot I just wish I would have taken more. I know I have promised to get the pics and instructions up for how to create the Copic Storage Box and I will hopefully get that done within the next 24 hours (maybe I'll log back on after the kids are in bed). See ya for now!
Friday, June 3, 2011
Copic Mixed Media in Indy!
Yes I am here in Indy and tomorrow I will be attending the Copic Ink, Art and Mixed Media Workshop. I can't tell you just how excited I am. It's also a relaxing weekend away for me and believe me I needed it. I have also completed my new Copic Storage Container and I will hopefully get some pictures and instructions uploaded soon. So can I tell ya, I came over tonight and of course visited Cord Camera (I teach for them in Columbus, Ohio). What do you know, they had 19 Copic colors that I didn't have yet. Needless to say I have them now!! Just getting those markers makes it a huge success in my book. I will post pictures from the class as soon as I possibly can. Goodnight for now.
Wednesday, May 18, 2011
Wow!!! I finally did it!!!
I have always wanted my own Blog but I'll admit I am technology challenged, so I was afraid to try it. If I new how easy it was I would have done it long before. I am a certified Copic Instructor and have just recently completed the Copic Intermediate Class. I will also be attending the Copic Ink and Art class in Indy in June. My hope for this site is that I will be able to share my creations and hopefully inspire others to find their creative side as well! Until next time!
Subscribe to:
Posts (Atom)